Краткое введение в микрофреймворк Flask
Если вы читали серию Мега-Учебник Flask, вы знаете что Flask это простой и достаточно мощный веб-фреймворк на Python.
Прежде чем мы углубимся в специфику веб-сервисов, давайте рассмотрим как обычно реализованы приложения Flask.
Я предполагаю, что вы знакомы с основами работы с Python на вашей платформе. В примерах я буду использовать Unix-подобную операционную систему. Короче говоря, это озночает, что они будут работать на Linux, MacOS X и даже на Windows, если вы будете использовать Cygwin. Команды будут несколько отличаться, если вы будете использовать нативную версию Python для Windows.
Для начала установим Flask в виртуальном окружении. Если в вашей системе не установлен , вы можете загрузить его из https://pypi.python.org/pypi/virtualenv.
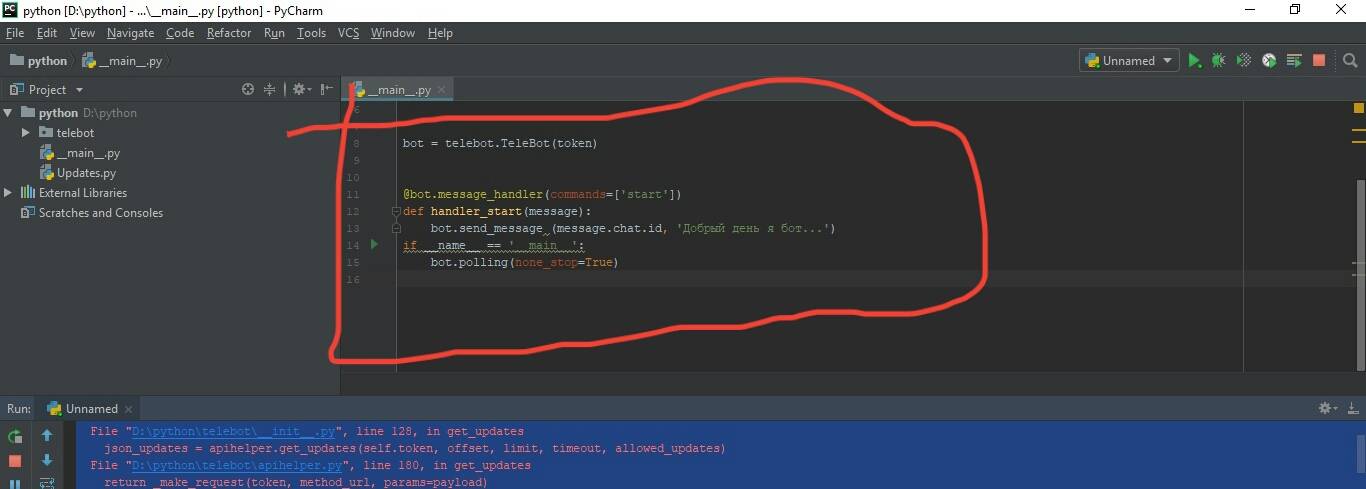
Теперь, когда Flask установлен давайте создадим простое веб приложение, для этого поместим следующий код в :
Чтобы запустить приложение, мы должны запустить :
Теперь вы можете запустить веб-браузер из набрать чтобы увидеть наше маленькое приложение в действии.
Просто, не так ли? Теперь мы будем конвертировать наше приложение в RESTful сервис!
Создаем ресурс персонажей
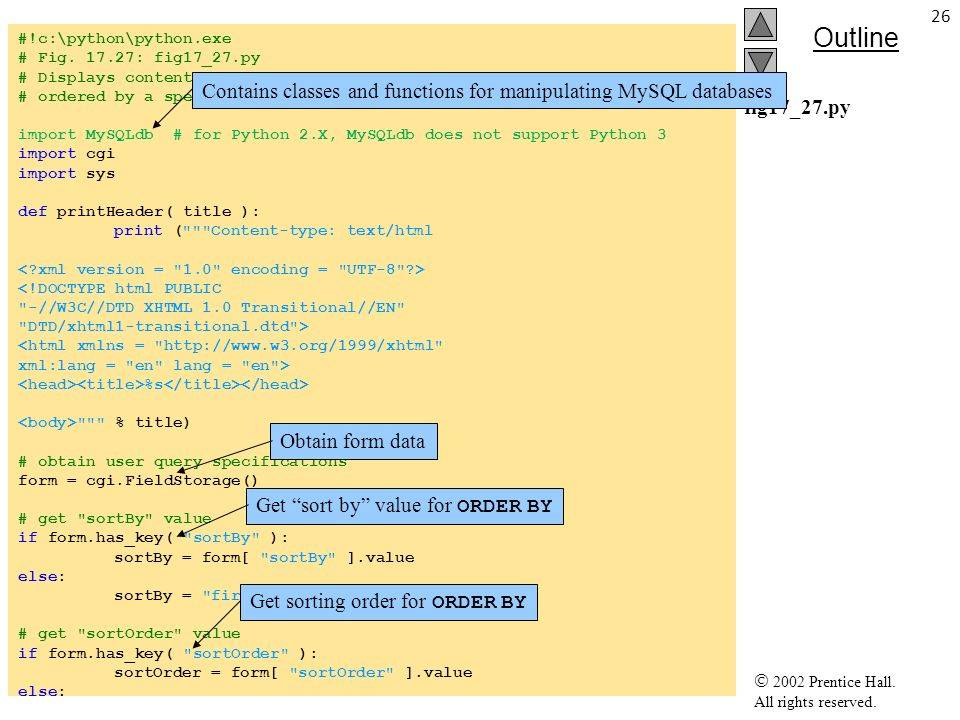
Теперь, когда у нас есть установленное приложение, мы можем начать создание Python API наших персонажей. Мы добавим конечные точки, которые позволяют клиенту получать список персонажей, создавать новых, выполнять поиск персонажей, обновлять и удалять персонажей. Перед созданием нового API нам нужно создать модель Character и CharacterMapper.
Shell
$ touch star_wars/models/character.py
$ touch star_wars/apis/v1/characters.py
$ touch star_wars/apis/v1/mappers/character.py
|
1 |
$touchstar_warsmodelscharacter.py $touchstar_warsapisv1characters.py $touchstar_warsapisv1mapperscharacter.py |
Начнем с очень простого объекта Character, который нужно назвать.
Python
from .base import db, BaseMixin
__all__ =
class Character(BaseMixin, db.Model):
__tablename__ = ‘character’
name = db.Column(db.Unicode(255), nullable=False)
|
1 |
from.base importdb,BaseMixin __all__=’Character’ classCharacter(BaseMixin,db.Model) __tablename__=’character’ name=db.Column(db.Unicode(255),nullable=False) |
Далее нам нужно импортировать модель в models/__init__.py
Shell
import datetime
from flask_sqlalchemy import SQLAlchemy
from sqlalchemy.ext.declarative import declared_attr
db = SQLAlchemy()
class BaseMixin(object):
@declared_attr
def id(cls):
return db.Column(db.Integer, primary_key=True)
@declared_attr
def created_at(cls):
return db.Column(db.DateTime, default=datetime.datetime.utcnow)
@declared_attr
def updated_at(cls):
return db.Column(db.DateTime, default=datetime.datetime.utcnow)
from .user import *
from .character import *
|
1 |
import datetime from flask_sqlalchemy import SQLAlchemy from sqlalchemy.ext.declarativeimport declared_attr db=SQLAlchemy() classBaseMixin(object) @declared_attr def id(cls) returndb.Column(db.Integer,primary_key=True) @declared_attr def created_at(cls) returndb.Column(db.DateTime,default=datetime.datetime.utcnow) @declared_attr def updated_at(cls) returndb.Column(db.DateTime,default=datetime.datetime.utcnow) from.userimport* from.characterimport* |
Задержка
Часто бывает нужно ограничить время ожидания ответа. Это можно сделать
с помощью параметра timeout
Перейдите на
раздел — / #/ Dynamic_data / delete_delay__delay_
и изучите документацию — если делать запрос на этот url можно выставлять время, через которое
будет отправлен ответ.
Создайте файл timeout_demo.py следующего содержания
Задержка равна одной секунде. А ждать ответ можно до трёх секунд.
python3 tiemout_demo.py
<Response >
Измените код так, чтобы ответ приходил заведомо позже чем наш таймаут в три секунды.
Задержка равна семи секундам. А ждать ответ можно по-прежнему только до трёх секунд.
python3 tiemout_demo.py
Traceback (most recent call last):
File «/usr/lib/python3/dist-packages/urllib3/connectionpool.py», line 421, in _make_request
six.raise_from(e, None)
File «<string>», line 3, in raise_from
File «/usr/lib/python3/dist-packages/urllib3/connectionpool.py», line 416, in _make_request
httplib_response = conn.getresponse()
File «/usr/lib/python3.8/http/client.py», line 1347, in getresponse
response.begin()
File «/usr/lib/python3.8/http/client.py», line 307, in begin
version, status, reason = self._read_status()
File «/usr/lib/python3.8/http/client.py», line 268, in _read_status
line = str(self.fp.readline(_MAXLINE + 1), «iso-8859-1»)
File «/usr/lib/python3.8/socket.py», line 669, in readinto
return self._sock.recv_into(b)
File «/usr/lib/python3/dist-packages/urllib3/contrib/pyopenssl.py», line 326, in recv_into
raise timeout(«The read operation timed out»)
socket.timeout: The read operation timed out
During handling of the above exception, another exception occurred:
Traceback (most recent call last):
File «/usr/lib/python3/dist-packages/requests/adapters.py», line 439, in send
resp = conn.urlopen(
File «/usr/lib/python3/dist-packages/urllib3/connectionpool.py», line 719, in urlopen
retries = retries.increment(
File «/usr/lib/python3/dist-packages/urllib3/util/retry.py», line 400, in increment
raise six.reraise(type(error), error, _stacktrace)
File «/usr/lib/python3/dist-packages/six.py», line 703, in reraise
raise value
File «/usr/lib/python3/dist-packages/urllib3/connectionpool.py», line 665, in urlopen
httplib_response = self._make_request(
File «/usr/lib/python3/dist-packages/urllib3/connectionpool.py», line 423, in _make_request
self._raise_timeout(err=e, url=url, timeout_value=read_timeout)
File «/usr/lib/python3/dist-packages/urllib3/connectionpool.py», line 330, in _raise_timeout
raise ReadTimeoutError(
urllib3.exceptions.ReadTimeoutError: HTTPSConnectionPool(host=’httpbin.org’, port=443): Read timed out. (read timeout=3)
During handling of the above exception, another exception occurred:
Traceback (most recent call last):
File «timeout_demo.py», line 4, in <module>
r = requests.get(‘https://httpbin.org/delay/7’, timeout=3)
File «/usr/lib/python3/dist-packages/requests/api.py», line 75, in get
return request(‘get’, url, params=params, **kwargs)
File «/usr/lib/python3/dist-packages/requests/api.py», line 60, in request
return session.request(method=method, url=url, **kwargs)
File «/usr/lib/python3/dist-packages/requests/sessions.py», line 533, in request
resp = self.send(prep, **send_kwargs)
File «/usr/lib/python3/dist-packages/requests/sessions.py», line 646, in send
r = adapter.send(request, **kwargs)
File «/usr/lib/python3/dist-packages/requests/adapters.py», line 529, in send
raise ReadTimeout(e, request=request)
requests.exceptions.ReadTimeout: HTTPSConnectionPool(host=’httpbin.org’, port=443): Read timed out. (read timeout=3)


Если такая обработка исключений не вызывает у вас восторга — измените код используя try except
python3 tiemout_demo.py
Response is taking too long.
Detailed Documentation
Trending returns an array of json objects. Example structure here
JSON object tree here
The userPosts Method
You can either define username OR BOTH id and secUid. Defining secUid and id is much faster than defining it by username, but it’s still an option.
username — the username of the tiktok user without the @
userid — The id of the user, can be found in the TikTok json response titled «userId»
secUid — Also found in the TikTok json response the key anme is «secUid»
Note: Currently limited to 30 because of some issues with getting past 30. It will raise an exception if you try for higher.
Trending returns an array of json objects. Example structure here
It has the same JSON object tree as trending. It’s here anyways.
The search_by_hashtag Method
hashtag — A string of the hashtag without the # mark. Ex: hashtag = «funny»
count — The number of results you want
Note: Currently limited to 30 because of some issues with getting past 30. It will raise an exception if you try for higher.
Since this isn’t an offical TikTok API the TikTok servers don’t know what to do with my bad solutions, this takes a bit longer as it needs to find the hashtagID and stuff.
Search by hashtag returns an array of json objects. Example structure here
It has the same JSON object tree as trending. It’s here anyways.
The get_Video_By_Url Method
video_url — The video you want to get url.
return_bytes — The default value is 0, when it is set to 1 the function instead returns the bytes from the video rather than just the direct url.
The get_Related_Videos Method
This method returns the suggested trending videos titled «trends for you» on desktop.
video_url — the video URL that you want to see related videos for
The search_by_sound Method
This method returns the trending videos under a specific sound or music link.
soundLink — Either the original sound link or the music link for a specific song.
count — Limited to 30 due to weird restrictions on the api.
verbose — 0/1 for debugging.
Create HTML Templates
Create a new directory in your main folder and name it . Flask will recognize this folder and serve HTML files from it.
Inside that directory create the file and add the following code,
<!DOCTYPE html>
<html lang="en">
<head>
<meta charset="utf-8">
<meta name="viewport" content="width=device-width, initial-scale=1.0">
<title>RapidAPI - TIkTok API</title>
<link href="/static/style.css" rel="stylesheet">
</head>
<body>
<main>
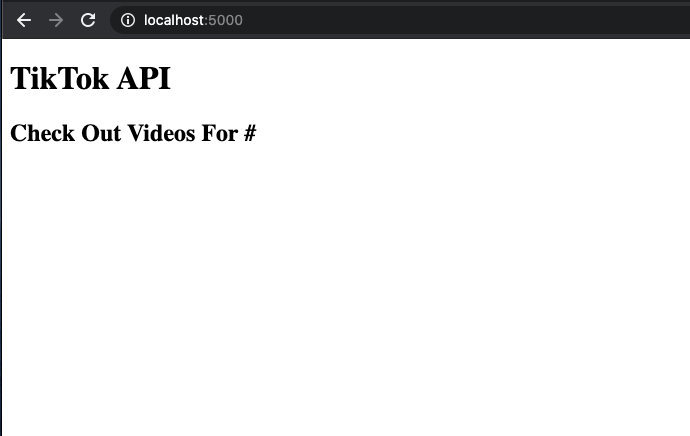
<h1>TikTok API</h1>
{% block content %}{% endblock %}
</main>
</body>
</html>
Flask uses Jinja2 templating to insert values and perform actions in HTML files. The templating syntax used in this file is:
We are creating a block content section named .
Next, create another file in the directory and name it . Add the following code.
{% extends 'base.html' %}
{% block content %}
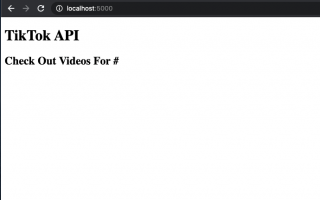
<section>
<h2>Check Out Videos For <span id="hashtag">#` hashtag `</span></h2>
` response `
</section>
{% endblock %}
In this file, we are specifying that this code extends the file. Furthermore, we are providing content for section.
To render the new templates, we need to import the function from Flask and return this function specifying the template name.
Change the code in to reflect the code below.
from flask import Flask, render_template
app = Flask(__name__)

@app.route('/')
def hello_world():
    return render_template('tiktok.html')
Lastly, save the files, restart the app, and visit the webpage again.
Now, we are rendering HTML content from our templates.
Set Up Python Project
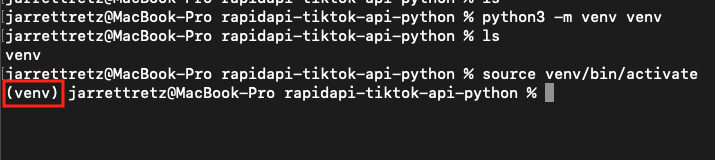
Open up a fresh terminal on your local machine. I am using Mac, so I will open up the Terminal application. Navigate to the directory you want to create the project in using the command.


Create a new directory named .
Change directories into that folder.
We are going to create a virtual environment so we can keep the package versions that we install locally to each project that we create in Python. This is beyond the scope of this article but you can use the link at the beginning of the paragraph to learn more.
This command creates a virtual environment in our current directory. Before we start downloading packages, we need to activate the virtual environment. PIP (Python Package Installer) will install packages to the virtual environment that we have activated. If none is activated, the packages get installed to our global Python library.
On Windows, run:
On Mac, run:
Your command prompt should now specify the virtual environment that you are using.
Next, download the Flask package using PIP.
For the application, we are also going to need the library.
Then, open up the project with your code editor. I am using VSCode.
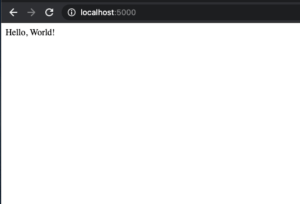
Create a file, in the root of the directory, name . Paste the below code into the file.
from flask import Flask
app = Flask(__name__)

@app.route('/')
def hello_world():
    return 'Hello, World!'
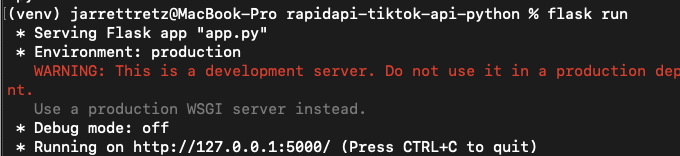
Finally, we need to set an environment variable that tells Flask what file to use for our application.
On Mac:
On Windows:
We can now start the application! In the terminal execute . You should see the output similar to the image below.
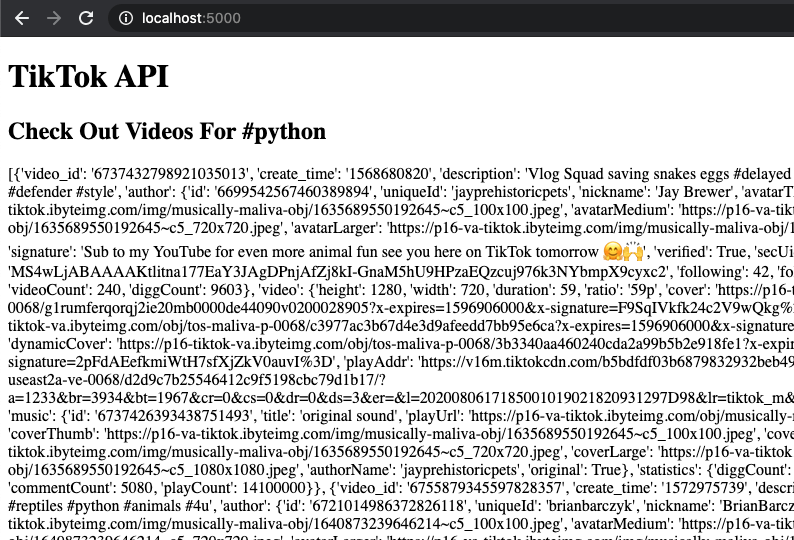
You can visit the URL http://localhost:5000/ in your browser to view the app.
Если вам позвонили из Yandex. Эти загадочные токены
Возможно, распознавать и синтезировать речь вам так понравится, что однажды вам позвонит милая девушка из Yandex и поинтересуется, все ли вам понятно в работе сервиса.
Продолжайте изучать документацию, и тогда вы узнаете, например, что iam_token живет не более 12 часов.
Чтобы быть вежливым, как наш дворецкий, и не перегружать сервера на Yandex, мы не будем генерировать iam_token чаще (при желании теперь стало можно генерить токен при каждом запросе). Заведите себе блокнотик и карандашик для записи даты генерации. Шутка.
Ведь у нас есть Python. Создадим функцию генерации. Снова используем requests:
Вызовем функцию и положим результат в переменную:
Карандишик и блокнотик не пострадали, а у вас появилась полезная переменная xpires_iam_token.
Специально для вас по мотивам этого материала я написала маленький кусочек проекта виртуального дворецкого Butler. Звуковые эффекты входят в комплект 🙂
Mixer (android.mixer)
The android.mixer module contains a subset of the functionality in found
in the pygame.mixer module. It’s
intended to be imported as an alternative to pygame.mixer, using code like:
try
    import pygame.mixer as mixer
except ImportError
    import android.mixer as mixer
Note that if you’re using the kivy.core.audio module, you don’t have to do
anything, it is all automatic.
The android.mixer module is a wrapper around the Android MediaPlayer
class. This allows it to take advantage of any hardware acceleration
present, and also eliminates the need to ship codecs as part of an
application.
It has several differences with the pygame mixer:
API Dashboard
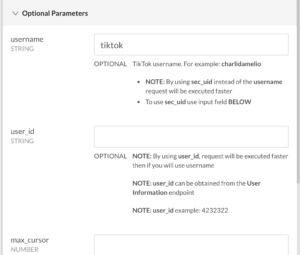
To view the various endpoints for the API visit the API’s homepage. Here, you will see an interactive dashboard that allows you to read about endpoints, test arguments, view sample code, and view example responses.
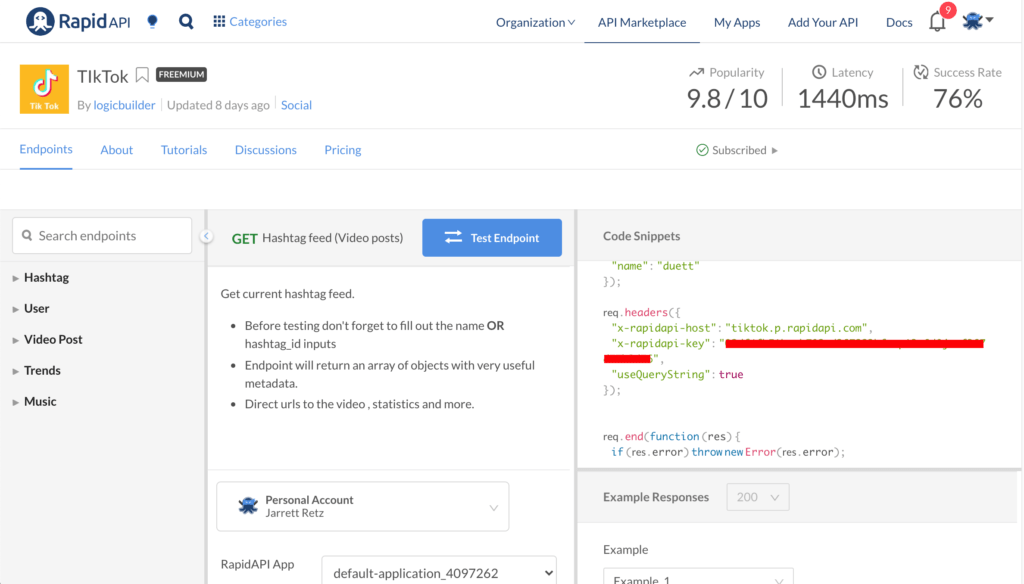
On the left side of the dashboard, you can use the dropdowns to select the endpoint you want to explore.
If you select an endpoint (i.e User feed) the other sections of the dashboard will update with the information for that endpoint. In the middle section, I can scroll to see the parameters that the route takes.


Also, the right side of the dashboard generates code snippets for different libraries and languages. In the picture below, I have selected Python and Requests.
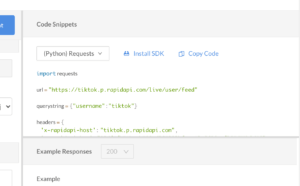
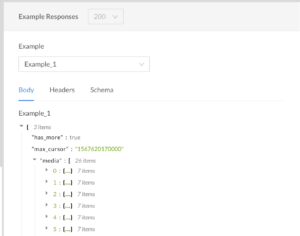
The lower portion on the right side of the dashboard displays example responses and test responses.
You need to subscribe to the API to test it on the dashboard. In the next section, I’ll discuss the pricing for the API and how to subscribe.
Call TikTok API with Python
We can use code snippets from RapidAPI to easily gather the information we need for the API request.
First, import and at the top of the file.
import requests
import json
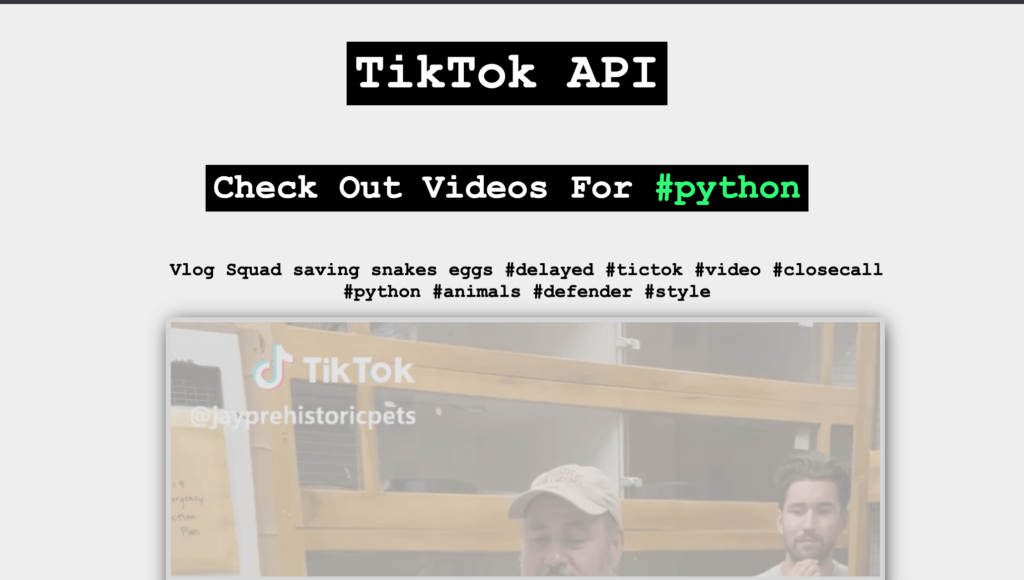
Then, at the top of the route declaration function, add the code below to call the hashtag feed endpoint.
...
    url = "https://tiktok.p.rapidapi.com/live/hashtag/feed"

    hashtag = "python"

    querystring = {"name": hashtag,"limit":"10"}
    headers = {
        'x-rapidapi-host': "tiktok.p.rapidapi.com",
        'x-rapidapi-key': "yourapikey"
    }

    response = requests.request(
        "GET",
        url,
        headers=headers,
        params=querystring
    )

    res_json = json.loads(response.text)
    videos = res_json
...
This API call is essentially taken straight from the dashboard. To display the response video data, we can pass context variables into the function.
....
    return render_template('tiktok.html', response=videos, hashtag=hashtag)
....
We are converting the text response data to a JSON object,
and then extracting the property from the object. This property holds the video metadata that we are going to iterate over in the template to display the videos.
API Key
Notice that for the value I didn’t insert my actual API key.
Your API key is a secret key that is unique to your account on RapidAPI. If someone discovers this key they can abuse it and run up your API quota. We need to keep this key secure.
To do this, we are going to use an environment variable to load the value in.
Stop the Flask server using the keyboard shortcut Ctrl+C in the terminal. Download , making sure the virtual environment is active and you are at the root of the project.
Then, create a file in the project root named . Add the following line to it replacing with your secret API key from RapidAPI.
In , add this code below the last import statement.
from dotenv import load_dotenv

load_dotenv()
RAPIDAPI_KEY = os.getenv("RAPIDAPI_KEY")
Finally, provide the variable as the value in the headers object for .
headers = {
    'x-rapidapi-host': "tiktok.p.rapidapi.com",
    'x-rapidapi-key': RAPIDAPI_KEY
}
Save the files, restart the app, and refresh the browser.
We can take note of a few things:
- Our API call works!
- The API key is loaded successfully and securely
- We need to format the data in the browser
Возможные улучшения
Есть несколько возможностей улучшить разработанный нами сегодня веб-сервис.
Для начала, настоящий веб-сервис должен общаться с настоящей базой данных. Структура данных в памяти очень ограниченный способ хранения данных и он не должен использоваться в реальных приложениях.
Запрос , который возвращает список задач, может быть расширен несколькими способами. Для начала это запрос может иметь опциональные агрументы, такие как количество задач на страницу. Другой путь сделать функцию более удобной это добавить критерии фильтрации. Например клиент может запросить только выполненые задачии или задачи, заголовок которых начинается с определенной буквы. Все эти элементы могут быть добавлены в URL как аргументы.
Getting Started
To get started using this api follow the instructions below.
It is quite a long installation process just for a TikTok api, the first release can be found here and is not as suitable for long term projects, however it may be easier for a day of scraping TikTok, as the installation is much easier.
Despite this, I still recommend you follow this process and use the latest version.
Installing
If you need help installing or run into some error, please open an issue. I will try to help out as much as I can.
Tested with python 3.7.3
Or install directly from this GitHub repo.
- You do need to have java installed
- You must add browsermob-proxy/bin to your environment path.
- Firefox must be installed.
- You must download the latest geckodriver from mozilla, and include the .exe in your path.
Что предлагает Тик ток для разработчиков
Разработчики со всего мира стараются вникнуть в структуру Тик Ток, поскольку это широкое пространство для многих удобств, благодаря чему деятельность будет не только интересной, но и финансово выгодной. Тик Ток для разработчиков может обеспечить:
Можно попробовать силы в создании новых фильтров и масок, которые для тик-токеров считаются важными в съемках видео.
Платформа социальной сети постоянно дополняется, поэтому разработчики с креативными и нестандартными идеями смогут завоевать высокооплачиваемое место работы.
Разработчики, вне зависимости от опыта, могут заниматься улучшением дизайна, поскольку пользователи постоянно предоставляют новые желания и требования, касаемо работы портала.
Программа tik tok api позволяет усовершенствовать свои навыки и знания в такой сфере деятельности, поэтому успех гарантируется на высоком уровне.
Можно в идеале узнать, что такое php serviceid и как он работает, что важно для сервисных разработчиков.
Разработчики смогут открыть для себя новые возможности для личностного развития, поэтому не стоит упускать представленного шанса.
Глобальный хакатон от Тик ток для разработчиков
При использовании Тик Ток Python разработчики получают много привилегий, которые открывают широкие удобства в рамках собственного роста и развития деятельности. Глобальный хакатон – это своеобразный шаблон видео, который позволяет при добавлении нескольких фотографий создать полноценный ролик с необычными эффектами. Это своеобразный видео-вирус, который позволяет активных тик-токерам создавать новый материал, а для разработчика – это популярность и признание своей деятельности.


Для разработчиков и активных пользователей Тик Ток станет «золотым дном», если правильно уметь им пользоваться, учитывать правила и требования площадки в плане ее стилистики. Умение реализовывать свои желания и полученные знания позволяют выйти на новый уровень, что и гарантирует работа разработчиком в Тик Ток.
Подготовимся. Настройка профиля CLI
Активация аккаунта на облаке
Для использования сервиса YSK у вас должна быть почта на Yandex. Если у вас её нет, то самое время завести.
Будьте готовы к тому, что вам потребуется еще подтвердить свой номер мобильного телефона. Без этого, увы, сервисы будут недоступны.
Почта есть. Теперь самое время перейти на cloud.yandex.ru. Перейдя в консоль надо активировать пробный период пользования сервисом. Для этого надо привязать платежную карту. Как только вы это сделаете вам будет доступен грант на 60 дней.
В облака – через командную строку
Для понимания, как работает распознавание и синтез, мы потренируемся в командной строке. Например, в iTerm.
Для отправки запросов на API через командную строку установим утилиту cURL. Перед установкой проверьте, возможно, она у вас уже есть ($ curl —version):
Теперь настроим Интерфейс Яндекс.Облака для командной строки (CLI). Запустим скрипт:
Перезапустите командную оболочку. В переменную окружения PATH добавится путь к исполняемому файлу – install.sh.
Теперь нам нужно, чтобы в CLI заработало автодополнение команд в bash:
Если у вас еще нет менеджера пакетов Homebrew, установите его. Он вам не раз пригодится, обещаю.
Затем ставим пакет bash-completion:
и посмотрим, что изменилось в файле ~/.bash_profile:
Примечание: ~/.bash_profile используется для пользовательских настроек, в частности – для определения переменных окружения.
Видим, что в конце bash_profile добавились новые строчки:
Выше новых строк вставьте эту:
Набираем команду:
и получаем приветственное сообщение:
Вам предложат выбрать облако (скорее всего у вас оно единственное):
Далее по желанию выберете Compute zone. Пока пользователь один – этим можно пренебречь.
Посмотрим, как выглядят настройки профиля CLI:
Мы в шаге от старта. Осталось добыть второй ключ (в настройках профиля он не будет отображаться):
Полетели!
Как установить и кодировать Python на Android? — Очень просто
Узнайте, как установить IDE Pydroid 3 на Android, а также полезные инструменты и библиотеки для практики программирования на Python!
«Мобильное» кодирование на Python возможно благодаря использованию интегрированной среды разработки Pydroid 3 (IDE). Pydroid — это минималистичный интерпретатор Python 3, который позволяет вам выполнять небольшие проекты в буквальном смысле на весу, разрабатывая и отлаживая программный код на вашем устройстве Android — будь то планшет или смартфон.
Если вы также хотите изучать программирование на Python в любом месте где нет ПК или ноутбука, то есть смысл воспользоваться Python для ПК, адаптированным для запуска в операционной системе Android. «Питон для Андроида» имеет собственное имя — Pydroid 3 — и это то, что вам нужно попробовать.
Сразу отметим, что отладчиков Python, разработанных для Android — несколько. Отличия — в функционале, цене, скорости и стабильности. Далее погрузимся в тему чуть глубже…
Независимо от того, являетесь ли вы новичком в программировании на Python или являетесь экспертом, давайте посмотрим, как вы можете использовать Pydroid 3 в полной мере на своем устройстве Android.
Style the Application
Create a folder in the root of the project and name it . Inside of , add the file .
Inside of , add the below code.
body {
    background: #EEE;
}

#hashtag {
    color: rgb(11, 250, 119);
}

main {
    display: flex;
    justify-content: center;
    align-items: center;
    flex-direction: column;
    font-family: 'Courier New', Courier, monospace;
}

section {
    text-align: center;
}

ul {
    list-style-type: none;
    text-align: center;
    width: 60%;
    margin: auto;
}

ul li {
    margin: 1rem;
    padding-bottom: 2rem;
}

h1, h2 {
    margin-bottom: 30px;
    margin-top: 30px;
    background: black;
    color: white;
    padding: .2rem .5rem;
    display: inline-block;
}

h1, h2, h3 {
    text-align: center;
}

h1 {
    font-size: 3.2rem;
}

h2 {
    font-size: 2.2rem;
}

video {
    box-shadow: 0px 0px 20px -2px black;
}
Finally, save the file and restart the application. The app now has some style!

Conclusion
Python can be used in many different ways to fetch data from APIs. You can use web frameworks like Flask and Django, Jupyter notebooks, or short scripts using a code editor like Python’s IDLE. Regardless of the medium, the API call remains largely unchanged.
However, the TikTok API will most likely change, but we can always check out the different endpoints and read about how to use them on the dashboard in RapidAPI.
Thanks for reading the article and congratulations on successfully building the application!
Создаем приложение ?
Мы используем Cookie Cutter для быстрого создания базовой структуры приложения и избегания всех скучных этапов перед созданием ресурса, который будет выдавать персонажей из нашей базы данных «Звездных Войн«. Если вы не хотите использовать Cookie Cutter, вы можете скачать готовую структуру здесь.
Shell
$ cookiecutter gh:mikeywaites/arrested-cookiecutter
project_name : star wars
project_slug :
package_name :
|
1 |
$cookiecutter ghmikeywaitesarrested-cookiecutter project_nameArrested Users APIstar wars project_slugstar-wars package_namestar_wars |
Теперь у нас есть базовый скелет приложения, давайте создадим контейнер Docker и создадим базу данных:
Shell
$ cd star_wars
$ docker-compose build
$ docker-compose run —rm api flask db upgrade
|
1 |
$cdstar_wars $docker-compose build $docker-compose run—rmapi flask db upgrade |
Теперь запускаем контейнер API и создаем запрос к конечной точке, чтобы убедиться в том, что все работает корректно.
Shell
$ docker-compose up api
$ curl -u admin:secret localhost:8080/v1/users | python -m json.tool
{
«payload»: []
}
|
1 |
$docker-compose up api $curl-uadminsecret localhost8080v1users|python-mjson.tool { «payload» } |
Ву а ля. Мы создали рабочий REST API за 5 минут.


Конечно, мы получили рабочий REST API, но вся тяжелая работа уже была сделана за вас, но вы все еще понятия не имеет, как использовать Arrested для создания API в Python. В следующем разделе мы рассмотрим, как создавать базовый API для нашей базы данных персонажей Звездных Войн.
Getting started
The miiocli is the main way to execute commands from command line.
You can always use —help to get more information about the available commands.
For example, executing it without any extra arguments will print out options and available commands:
$ miiocli --help
Usage: miiocli  COMMAND ...

Options:
  -d, --debug
  -o, --output
  --help                          Show this message and exit.

Commands:
  airconditioningcompanion
  ..
You can get some information from any miIO/miOT device, including its device model, using the info command:
miiocli device --ip <ip> --token <token> info

Model: some.device.model1
Hardware version: esp8285
Firmware version: 1.0.1_0012
Network: {'localIp': '<ip>', 'mask': '255.255.255.0', 'gw': '<ip>'}
AP: {'rssi': -73, 'ssid': '<nnetwork>', 'primary': 11, 'bssid': '<bssid>'}
Each different device type is supported by their corresponding module (e.g., vacuum or fan).
You can get the list of available commands for any given module by passing —help argument to it:
$ miiocli vacuum --help

Usage: miiocli vacuum  COMMAND ...

Options:
  --ip TEXT
  --token TEXT
  --id-file FILE
  --help          Show this message and exit.

Commands:
  add_timer                Add a timer.
  ..
Resources for Learning Python
My favorite tutorial for Python is from Python’s documentation. They have a Beginner Python Tutorial for a solid introduction to the language from the source. If you have a bigger appetite, I recommend the book Automate the Boring Stuff with Python.
For an introduction to sending HTTP requests and using an API with Python, check out this article. Additionally, you can find more Python API articles on RapidAPI’s blog.
If you are already comfortable with Python, then feel free to jump into the next section where we build a small Flask application to fetch TikTok videos based on a predefined hashtag. Let’s begin!
How to Use the TikTok API with Python
Flask is a microframework for web development with Python. Its easy setup has made it a popular way for developers to get a web application up and running.
We are going to use the framework to create one route that fetches videos for a predefined hashtag.
Улучшаем интерфейс нашего сервиса
Сейчас основная проблема дизайна нашего сервиса в том, что клиенты вынуждены строить URI самостоятельно исходя из ID задач. Этот легко, но дает знание клиенту как строятся URI для доступа к данным, что может помешать в будущем, если мы захотим внести изменения в URI.
Вместо id задачи мы вернем полный URI, через который будет осуществляться выполнение всех действий с задачей. Для этого мы напишем маленькую функцию-хелпер, которая будет генерировать «публичную» версию задачи, отправляемую клиенту:
Все что мы делаем здесь это берем задачу из нашей базы данных и создаем новую задачу в которой все поля идентичны, за исключением поля , которое заменено полем , сгенерированным функцией предоставляемой Flask.
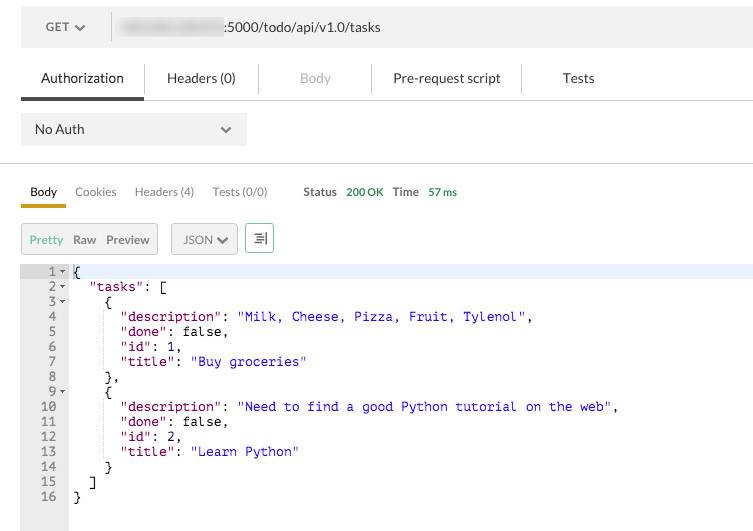
Когда мы возвращаем список задач мы прогоняем все задачи через эту функцию, прежде чем отослать клиенту:
Теперь клиент получает вот такой список задач:
Применив эту технику к остальным функциям мы сможем гарантировать, что клиент всегда получит URI, вместо id.
Broadcast (android.broadcast)
Implementation of the android BroadcastReceiver.
You can specify the callback that will receive the broadcast event, and actions
or categories filters.
- class
-
Warning
The callback will be called in another thread than the main thread. In
that thread, be careful not to access OpenGL or something like that.- (callback, actions=None, categories=None)
-
Parameters: -
callback – function or method that will receive the event. Will
receive the context and intent as argument. - actions – list of strings that represent an action.
- categories – list of strings that represent a category.
For actions and categories, the string must be in lower case, without the prefix:
# In java: Intent.ACTION_HEADSET_PLUG
# In python: 'headset_plug'
-
callback – function or method that will receive the event. Will
- ()
-
Register the receiver with all the actions and categories, and start
handling events.
- ()
-
Unregister the receiver with all the actions and categories, and stop
handling events.
Example:
В данной статье мы рассмотрим
- Использование Cookie Cutter шаблона для установки приложения Flask вместе с базой данных SQLAlchemy ORM для взаимодействия с базой данных, Kim Mappers для сериализации и сортировки, хранилище Docker для среды разработки и пример пользовательского API;
- Создание ресурсов на тему Звездных Войн, для получения списков персонажей, создания новых персонажей, поиск персонажей по ID и наконец, обновление и удаление персонажа.
Список ресурсов инструментов, которые мы будем использовать
- Docker – используется во всех наших примерах;
- Git – для клонирования некоторых хранилищ;
- Cookie Cutter – инструмент для создания проектных шаблонов;
- Flask – наш фреймворк Arrested работает на Flask, микро-фреймворке для Python, который в свою очередь базируется на Werkzeug;
- Kim – фреймворк Python для сортировки и сериализации;
- Arrested – фреймворк для быстрого создания API при помощи Flask
Rendering TikTok API Response Data
We can use Jinja2 templating syntax and keywords to iterate over the video data and render it in the browser.
Open , and replace the variable with this code.
<ul>
    {% for video in response %}
        <li>
            <h3>` video`.`description `</h3>
            <video width="` video`.`video`.`width `" height="` video`.`video`.`height `" controls>
                <source src="` video`.`video`.`playAddr `">
            </video>
            <p>Author: ` video`.`author`.`nickname `</p>
        </li>
    {% endfor %}
</ul>
There is plenty of data to extract from the API call. However, we are only going to use the:
- video description
- play address ()
- video height and width
- author nickname
In the above code, I am using dot-notation to access these values from each video object in the response data.
If you restart the Flask server and refresh the browser, you’ll notice that the videos are now displayed. They can also be played!
We have successfully fetched data, based on the hashtag, and rendered it in the browser.
Что такое REST?
- Клиент-Сервер: Должно быть разделение между сервером, который предлагает сервис и клиентом, который использует ее.
- Stateless: Каждый запрос от клиента должен содержать всю информацию, необходимую серверу для выполнения запроса. Другими словами, сервер не обязан сохранять информацию о состоянии клиента.
- Кэширование: В каждом запросе клиента должно явно содержаться указание о возможности кэширования ответа и получения ответа из существующего кэша.
- Уровневая система: Клиент может взаимодействовать не напрямую с сервером, а с произвольным количеством промежуточных узлов. При этом клиент может не знать о существовании промежуточных узлов, за исключением случаев передачи конфиденциальной информации.
- Унификация: Унифицированный программный интерфейс сервера.
- Код по запросу: Сервера могут поставлять исполняемый код или скрипты для выполнения их на стороне клиентов.